

- First, Drill a hole.
- Start by cleaning up the surface with a skew chisel.
- Then put a starter hole in with the tip of the skew.

Start Hole with tip of skew - Make sure the quill lock is snug but not tight.
- Tighten the quill lock and then back it off a 1/8 turn.
- When you start to drill, hold the Jacobs chuck securely so it doesn’t pop out of its morse taper.
- Lock your tail stock in place and slowly advance the quill.
- Then using a 1” Forstner bit plunge in about a 1 ½” deep.
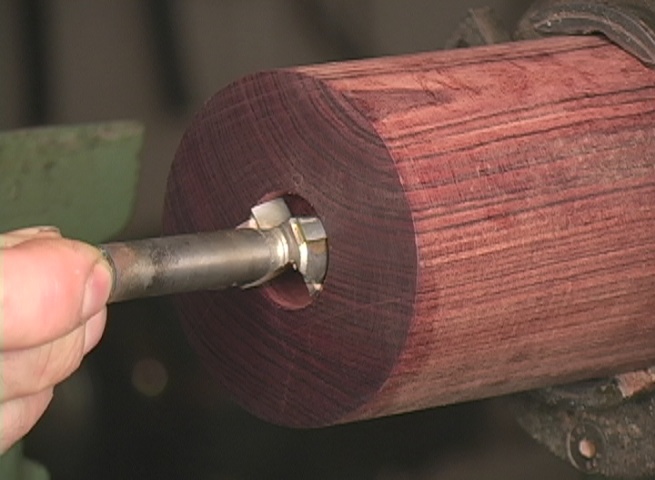
- Then take the bit you just used out of the Jacobs chuck and insert it into the hole you just drilled. If it’s snug, you may not need to read any further.

Test bit for a snug fit - But if there’s a lot of lateral movement, keep reading. I’ll show you how to troubleshoot and fix some common and some not so common problems that can cause sloppy holes.
- I know quite a few issues that can affect drilling accuracy.
So let’s start with the first issue.

Dull drill bits smoke and tend to wander and veer off course especially twist drill bits and brad point bits. It’s also a heavier burden on the tailstock and increases wear and tear on the internal parts.

You can sharpen plain Forstner or even carbide Forstner bits by hand using a diamond file. You can also re-sharpen twist drill bits using a jig called the drill doctor.


Lack of maintenance can lead to the Quill threads being misshapen, warped, or bent. Take apart your quill regularly to check and maintain the threads on the quill screw. Visually check for misshapen threads.

The screw on the left has been abused and needs replacing while the screw on the right has been well maintained. Look closely at the photo and you’ll notice all the threads are rounded over. If the quill screw looks questionable, you’ll likely have a mirror image on the inside of the quill. This creates a loose quill advancement that can wander while drilling holes. Replace with a new one if worn to help maintain your lathe’s tailstock.
To prevent this from happening on the replacement quill, clean and grease the threads often. I clean the threads and change the grease after every twenty cocobolo mills or after every forty cherry mills. With spalted maple, it may be fifty mills or more. The idea is the denser the wood, the more often you should change the grease. Ignoring this maintenance task leads to sloppy hole issue #3.
The Quill pin guide slot should be greased as well. Otherwise, the slot wears and creates for a sloppy drilling action. A newer quill pin slot has hardly any movement.

In the accompanying video, you’ll notice I’ve machined a new guide pin slot to add a bit more life to this quill. Replace if necessary. You may also want to check the diameter of the quill pin. That may need replacing as well.
So to maintain the quill, using a soft cloth, I like to clean all the threads of old grease and sawdust. And while cleaning, make sure you don’t lose the key that lines up with the handwheel. This allows you to retract and advance the quill when it’s mounted in the tailstock. And don’t forget to clean behind the guide pin because grease and sawdust will tend to build.
Check and make sure the centers line up tip to tip.

- First, bring in the tailstock with centers mounted.
- Crank out the quill about a 1/2″ or so making sure the tail center’s morse taper is making good contact with the quill.
- When the centers meet lock the tailstock into position.
- If the centers don’t line up tip to tip from a side view, Up and Down, the ways of the bed may be worn, the tailstock is worn, or if your lathe has a rotating headstock that might be the problem.
These issues are beyond the scope of this article, however, a more common problem is that the centers don’t line up side to side from a top view and minor discrepancies can be fixed.
As woodworkers, we know that if we dimple wood…say with a punch, it compresses the wood fibers into a hole. But when doing the same with steel, and punching it – it mushrooms – proud of the surface around it. You can see the mushroom adding a bit more thickness to the steel in the accompanying photo.

This is an advantage. We can take up the slack or slop of the tailstock and realign the centers once again.
My tail center is pointing slightly to the right when viewed from above. So I’ll need to adjust the bottom of the tailstock. The dimple will be applied to both sides on the male portion of the Tailstock base. I want my tail center to move left, so by punching the base in the location shown in the photo as well as the diagonally opposite corner, will essentially turn the center to the left. And the opposite is true if I punch the other corners. It will turn the center to the right.
- And just to be clear….. see photo: Dimple position on tailstock is the surface I’ll be dimpling.


This leads us to the 5th issue. Maintain your Jacobs chuck. Sawdust buildup inside the jaws of the chuck can throw off your accuracy by allowing the bit to be tightened askew. Whenever changing your bit always tap out the debris and sawdust that tends to build inside and around the jaws of the chuck. Sawdust buildup can play havoc with accuracy.
And finally….Don’t assume your Jacobs chuck is running true. Somebody before you may have dropped it. A bent drill chuck arbor can cause a lot of grief. So test them for trueness, because you won’t even notice it when it’s mounted in the tailstock. So mount the chuck in the headstock and test for trueness, either by rotating it under power or lining it up with a mounted brad-point bit opposite a dead center in the tailstock.

In many cases, you can replace just the drill chuck arbor. A common Jacobs chuck taper is a JT6. This taper mates as a friction fit with the Jacobs chuck. The opposite end features a morse taper 3. You can also get an arbor in a morse taper 2. Just obtain the appropriate replacement to fit your lathe.

These are the drilling issues that have plagued me over the years when hogging out grinders on the lathe. As you can see, it’s easy to maintain your lathe’s tailstock. I hope these few tips help save you the frustration and countless hours I spent troubleshooting off-center drilling. I also hope that these solutions will help you to repair your lathe so that you will be able to create and make a better product in the end. If you’ve run into different lathe drilling problems on your own and solved them, post them in the comments down below. I’m sure others would be interested in them as well.
This Post Has One Comment
Great article. I just checked my centers and they don’t quite line up. I’ll try your method of recentering them by punching the tailstock. Thanks.